DELUTS UNIVERSE
CLASSIC FILMS PACK A CST
SECTION 1
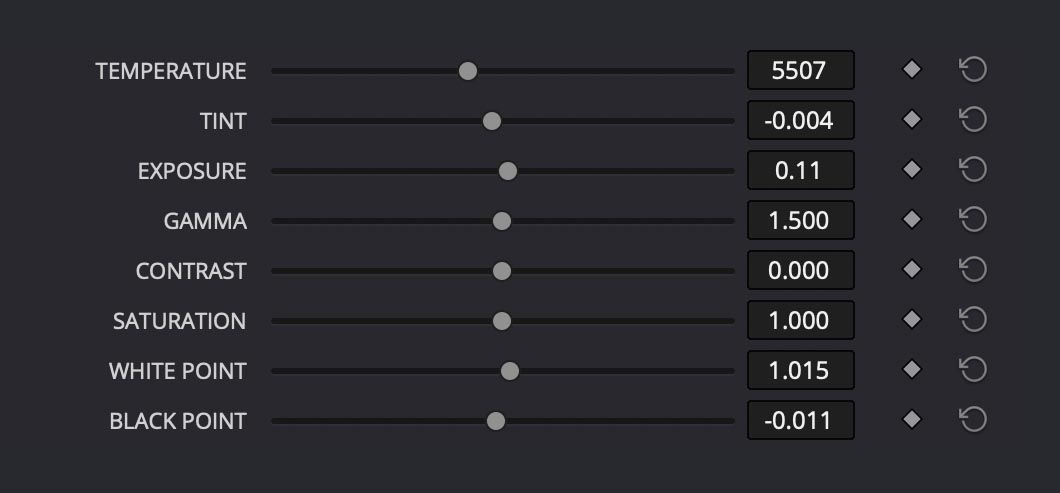
TEMPERATURE
The TEMPERATURE control adjusts the overall warmth or coolness of your image, mimicking the colour temperatures of different light sources. Operating on a scale from 0 to 13000 Kelvin, this slider helps correct colour casts or can be used creatively to enhance mood. Higher values warm up the image by adding orange tones, while lower values cool it down by adding blue. This is essential for:
- Correcting various lighting conditions (tungsten, daylight, shade)
- Matching footage from different times of day
- Setting a specific mood or atmosphere
- Harmonising footage from different cameras
The wide range (0-13000K) provides precise control while maintaining natural-looking results, with 6500K representing a neutral daylight balance point and can be set early on in the pipeline or at the end of the chain (EOC) when activated via the checkbox 'WHITE BALANCE EOC'.

TINT
The TINT control provides fine adjustment of the magenta/green color balance in your image. Working in conjunction with TEMPERATURE, but operating on a different axis, TINT helps correct colour casts that temperature alone can't address. Positive values add magenta, while negative values add green. This is particularly useful for:
- Correcting fluorescent lighting colour casts
- Fine-tuning skin tones
- Compensating for atmospheric conditions that affect colour
- Balancing mixed lighting conditions
The slider operates in a range from -0.1 to 0.1, allowing for subtle corrections while preventing extreme shifts that could make the image look unnatural.
EXPOSURE
The EXPOSURE provides precise control over image brightness with a range of -5 to +5 stops. When brightening, it uses traditional exposure multiplication for a natural response. When darkening, it employs gamma correction to preserve shadow detail and prevent crushing of blacks. Applied later in the processing chain, this makes it ideal for creative decisions and final look adjustments.
Key features:
- Natural response in both highlights and shadows
- Preserves colour integrity even with extreme adjustments
- Range of ±5 stops provides ample creative flexibility
- Particularly useful for matching shots or achieving specific creative looks
The placement ensures it works harmoniously with other controls while maintaining a filmic response to large adjustments.
GAMMA
Controls the power function of the mid-tones, effectively adjusting the brightness distribution across your image with emphasis on the middle values. Operating in a range from 0.5 to 2.5 (default 1.5), this control allows precise adjustment of mid-tone contrast without significantly affecting deep shadows or bright highlights. Lower values brighten mid-tones while higher values darken them. This is particularly useful for:
- Fine-tuning overall image density
- Correcting footage that appears too flat or too contrasty
- Adjusting perceived exposure while maintaining highlight and shadow detail
- Compensating for different display environments
The control provides a smooth, natural response that maintains image integrity even with significant adjustments.
CONTRAST
Adjusts the difference between the bright and dark areas of your image, operating on a range from -2.0 to +2.0. This implementation uses a smooth contrast adjustment curve centred around middle grey to prevent harsh transitions or unwanted colour shifts. Positive values increase separation between tones while negative values reduce it. The control is particularly effective for:
- Enhancing or softening image definition
- Matching contrast levels between different shots
- Adapting to different delivery requirements
- Creating specific moods or styles while maintaining natural skin tones
Applied late in the processing chain, this contrast adjustment maintains colour integrity and provides a cinematic response even at extreme settings.
SATURATION
Controls the intensity of colours in your image, with a range from 0.0 (monochrome) to 2.0 (double saturation). This implementation uses luminance-preserving saturation, ensuring colours become more or less intense while maintaining their natural brightness and preventing unwanted shifts in exposure. The adjustment is particularly useful for:
- Fine-tuning overall color intensity
- Matching footage from different cameras
- Compensating for optical or sensor characteristics
- Creating specific looks from subtle to vibrant
The control is designed to provide natural results even at extreme settings, preventing color clipping or "neon" effects that can occur with simple saturation adjustments.
WHITE POINT
Adjusts the luminance level of the brightest parts of your image, operating on a range from 0.5 to 1.5. This control allows you to set the upper boundary of your image's dynamic range, effectively changing where highlights begin to clip. Higher values expand the highlight range while lower values compress it. Particularly useful for:
- Fine-tuning highlight roll-off
- Matching different cameras' highlight handling
- Adjusting for different delivery specifications
- Controlling highlight intensity without affecting mid-tones
Applied near the end of the processing chain, this control provides precise highlight management while maintaining natural-looking results.
BLACK POINT
Controls the luminance level of the darkest parts of your image, with a range from -0.5 to 0.5. This adjustment sets the lower boundary of your image's dynamic range, determining at what level true black begins. Positive values lift the blacks while negative values deepen them. Particularly useful for:
- Setting the depth of shadows
- Compensating for viewing environment
- Matching black levels between different sources
- Creating specific looks from rich blacks to muted shadows
Applied near the end of the processing chain, this control maintains smooth shadow gradients while preventing unwanted colour shifts in dark areas.
SECTION 2
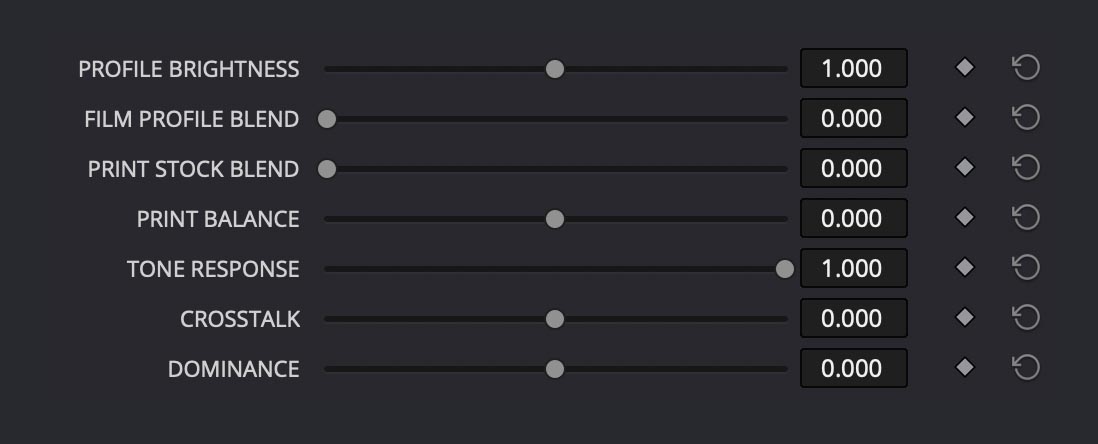
PROFILE BRIGHTNESS
Applied before the Film profile, this control (range 0.0 to 2.0) provides subtle adjustments to the film profile's brightness characteristics. Operating in Linear space, it simulates exposure adjustments to the film negative before development. This approach:
- Influences how the film profile responds to different brightness levels
- Provides more nuanced control over the film look
- Maintains the natural characteristics of the chosen film stock
- Allows fine-tuning without compromising the film profile's unique qualities
This is different from regular exposure control as it specifically affects how the film profile interprets the image, similar to adjusting exposure during the photochemical process.
FILM PROFILE BLEND
Controls the intensity of the selected film stock emulation, with a range from 0.0 to 1.0. This precise control determines how strongly the chosen film characteristics are applied to your image. At 0.0, no film emulation is applied; at 1.0, you get the full film stock effect. This is essential for:
- Fine-tuning the strength of film emulation
- Creating subtle hybrid looks between digital and film
- Maintaining flexibility while working with film profiles
- Balancing between different creative requirements
The control provides smooth blending that maintains colour integrity and natural transitions, allowing you to dial in exactly the right amount of film character for your image.
PRINT STOCK BLEND
Controls the intensity of the print film stock emulation, with a range from 0.0 to 2.0. This control simulates the characteristics of motion picture print films, affecting contrast, colour, and grain structure in ways specific to the printing process. Higher values intensify the print stock effect while lower values reduce it. Particularly useful for:
- Adding authentic print film characteristics
- Fine-tuning the balance between negative and print stock looks
- Creating period-specific aesthetics
- Achieving traditional motion picture colour and contrast responses
The extended range up to 2.0 allows for both subtle print stock influences and more dramatic print film effects while maintaining natural colour behaviour.
PRINT BALANCE
Controls the colour balance adjustments using a specialised cross-tint matrix, with a range from -0.5 to 0.5. Operating similarly to traditional film lab printer lights, this control emulates the subtle colour timing adjustments made during optical printing. This approach:
- Provides nuanced colour shifts that primarily affect highlight areas
- Maintains natural colour relationships while adjusting balance
- Creates authentic optical printing colour characteristics
- Preserves overall image density during adjustments
The symmetrical range allows for precise control over colour balance while retaining the natural look and feel of traditional film printing techniques, making it particularly useful for final colour timing adjustments.
TONE RESPONSE
Controls the balance between the input gamma transform and the original signal, with a range from 0.0 to 1.0. Operating in the early stage of the processing chain, this control determines how strongly the gamma transformation affects your image. This approach:
- Provides precise control over the image's contrast response
- Allows blending between linear and gamma-corrected signals
- Maintains highlight and shadow detail during adjustment
- Creates flexible tone mapping for different source materials
The control acts as a sophisticated mix between the original and gamma-transformed image, making it particularly useful for optimizing your image's tonal response while preserving natural-looking results.
CROSSTALK
Controls the amount of inter-channel colour mixing, with a range from -0.2 to 0.2. Operating at a fundamental level in the colour processing chain, this control emulates the natural interaction between colour layers found in photochemical film. This approach:
- Creates organic colour mixing similar to film emulsion layers
- Helps reduce colour noise in underexposed areas
- Provides subtle colour support between channels
- Adds film-like cohesion to digital source material
The control allows for both positive and negative mixing effects, making it particularly useful for enhancing the organic feel of digital footage while maintaining natural colour relationships.
DOMINANCE
Controls the intensity of the most prominent colours in your image, with a range from -0.2 to 0.2. Operating through secondary cross-channel mixing, this control allows selective enhancement or reduction of dominant colours while preserving overall colour balance. This approach:
- Enhances or reduces impact of strong colour sources
- Maintains natural colour relationships in neutral areas
- Provides targeted control over prominent colours
- Preserves overall scene colour balance
The control is particularly effective for managing strong practical light sources like neon signs, emergency lights, or any dominant colour elements while maintaining a natural look in the rest of the image.
SECTION 3
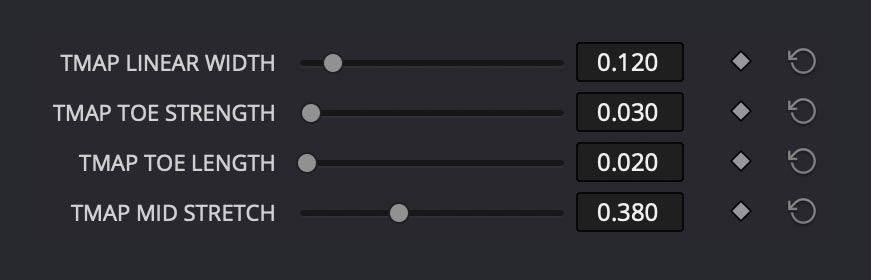
TONE MAPPING ADJUSTMENTS
Provides fine control over the filmic tone mapping curve through four specialised parameters. These advanced controls allow precise adjustment of the curve's characteristics across different tonal ranges. This approach:
- TMAP LINEAR WIDTH (0.0-1.0) adjusts the size of the linear section of the curve
- TMAP TOE STRENGTH (0.0-1.0) controls shadow compression intensity
- TMAP TOE LENGTH (0.0-1.0) determines how far the toe region extends
- TMAP MID STRETCH (0.0-1.0) affects the contrast in mid-tone regions
These controls work together to shape the overall tone mapping response, providing cinematographic highlight handling while maintaining natural contrast throughout the image. Typically fixed in standard versions, these parameters allow advanced users to fine-tune the filmic look for specific creative needs.
SECTION 4
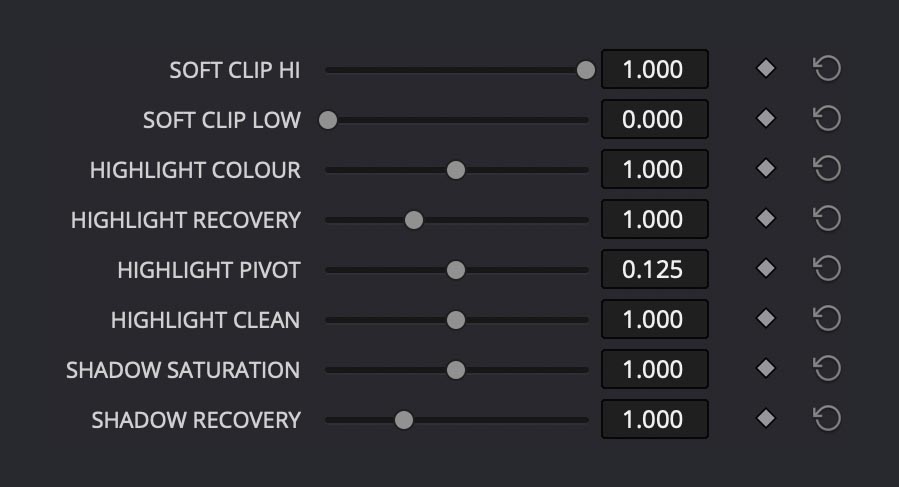
SOFT CLIP CONTROLS
Manages highlight and shadow roll-off through two complementary parameters, both ranging from 0.0 to 1.0. Operating in linear space, these controls provide natural compression of extreme values while preserving detail and colour integrity. This approach:
- SOFT CLIP HI smoothly compresses highlights to prevent harsh clipping
- SOFT CLIP LOW gently lifts shadows while maintaining richness
- Preserves detail in extreme exposure ranges
- Maintains natural colour response during compression
The controls work together to create organic-looking transitions at both ends of the exposure range, similar to the natural shoulder and toe response of film, while avoiding the artificial look of hard clipping.
HIGHLIGHT COLOUR
Controls the colour response in bright areas of your image, with a range from 0.5 to 1.5. Operating in the highlight region, this control affects how colours behave as they approach their maximum values, similar to film's characteristic highlight handling. This approach:
- Adjusts colour balance specifically in bright areas
- Creates natural highlight roll-off characteristics
- Provides control over highlight colour separation
- Gives classic Magenta/Cyan highlight
The control allows fine-tuning of how colours react in the brightest areas of your image, simulating film-like highlights while maintaining a natural, film-like response.
HIGHLIGHT RECOVERY
paired with 'HIGHLIGHT PIVOT' gives you precise control over the brightest areas of your image. While HIGHLIGHT RECOVERY (0.5 to 2.0) determines how much the bright areas are compressed, HIGHLIGHT PIVOT (0.0 to 0.250) sets where this compression begins. Together they provide:
- Fine control over how bright areas transition and roll off
- Natural-looking recovery of detail in overexposed areas
- Preservation of highlight colour and texture
- Smooth blending between compressed and normal areas
These controls are especially useful when dealing with challenging scenes like bright skies, wedding dresses, or sun reflections, where you want to maintain detail while keeping the image looking natural rather than artificially compressed.
HIGHLIGHT CLEAN
Helps restore natural highlight behaviour when other adjustments have compressed your highlight range (Range: 0.5 to 1.5). This control provides a targeted way to:
- Counteracts highlight compression from other adjustments
- Restores natural brilliance to compressed highlights
- Maintains highlight separation when using heavy film profiles
- Helps balance the exposure range after applying strong looks
This control is particularly useful when working with film profiles or when 'PROFILE BRIGHTNESS' has reduced your highlight range too much. Think of it as a "highlight restoration" tool that helps maintain a natural, clean look in your brightest areas while preserving the character of your chosen film profile.
SHADOW SATURATION
Helps you control the colour intensity specifically in the darker areas of your image (Range: 0.500 to 1.500). This nuanced control provides a way to:
- Adjust colour richness in shadow areas independently
- Prevent shadow areas from becoming muddy or oversaturated
- Maintain natural colour appearance in darker regions
- Fine-tune the balance between shadow detail and colour depth
This control is particularly useful when working with underexposed areas or scenes with deep shadows, where you want to maintain colour fidelity without making the shadows look artificial. It's especially effective when paired with SHADOW RECOVERY to create natural-looking shadow areas that retain both detail and appropriate colour intensity.